This article is modified from What.CD’s wiki called X Lossless Decoder (XLD): How to Create Flawless Rips on Mac OS X. I remake the screenshots.
Summary
This guide is an introduction that will teach you to configure XLD correctly, to rip a CD, and to check ripping (extraction) logs for a good CD rip. It is intended primarily as a beginners’ guide, so some more advanced features are (currently) omitted.
The official software page describes XLD:
X Lossless Decoder (XLD) is a tool for Mac OS X that is able to decode/convert/play various ’lossless’ audio files. The supported audio files can be split into some tracks with cue sheet when decoding. It works on Mac OS X 10.4 and later.
XLD is Universal Binary, so it runs natively on Intel Macs, PPC Macs, and the latest ARM Macs.
It’s STRONGLY recommended to use version 20211018 or newer. If you are using an older version, then go to XLD menu > Check for Updates to make sure you have the latest version.
This guide was made using the latest version of XLD available at the time. XLD version 20211018. Placement of options may vary depending on the version, but the options required to create a proper configuration remains the same.
Download
XLD Application
Download and install XLD builds and source code from the following links:
Log Checker Plugin
This plugin is required to write the rip checksum at the bottom of every log.
To add the LogChecker functionality:
Download the plugin:
Unzip, then get XLDLogChecker.bundle.
You manually apply the plugin by putting the XLDLogChecker.bundle file into ~/Library/Application Support/XLD/PlugIns (case sensitive). You can go to this folder by using the “Go to Folder” option (Command + Shift + G) from within Finder and pasting the full path into the resulting text box.
Then restart XLD.
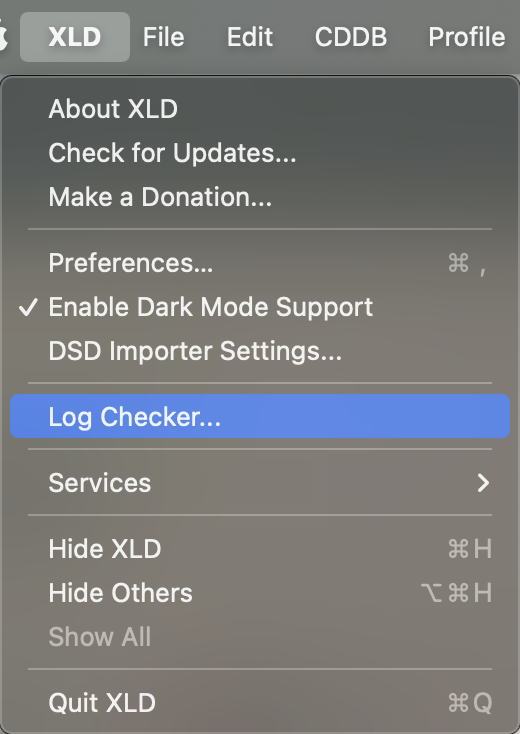
Once installed properly, you will see an option for “Log Checker…” under the XLD menu. You will most likely have to restart XLD for the Log Checker to take effect.
Configuration
It is very important to properly configure XLD for lossless (FLAC) rips so that the ripping log will score 100% on the logchecker. This guide will also cover encoding lossy formats (such as MP3), as well.
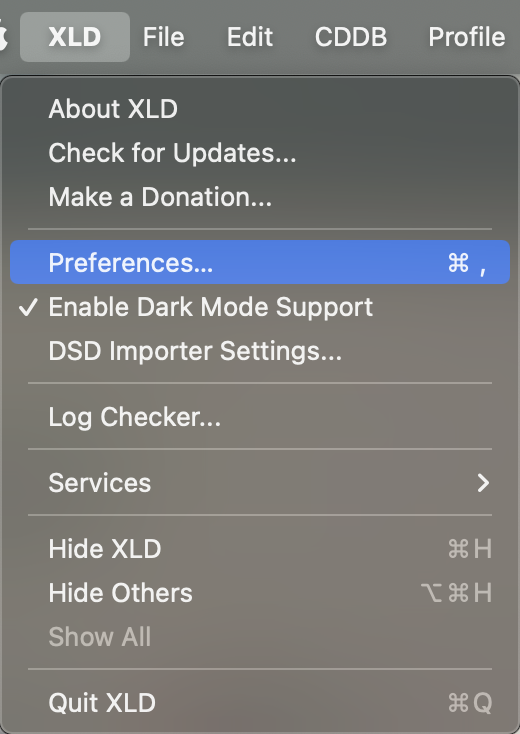
After checking for updates go to XLD menu > Preferences, or hit Command-, (Command is the key with the Apple logo).
General
We will configure with the assumption that you will rip a disc to FLAC (and then transcode the FLAC files to MP3 if you desire).
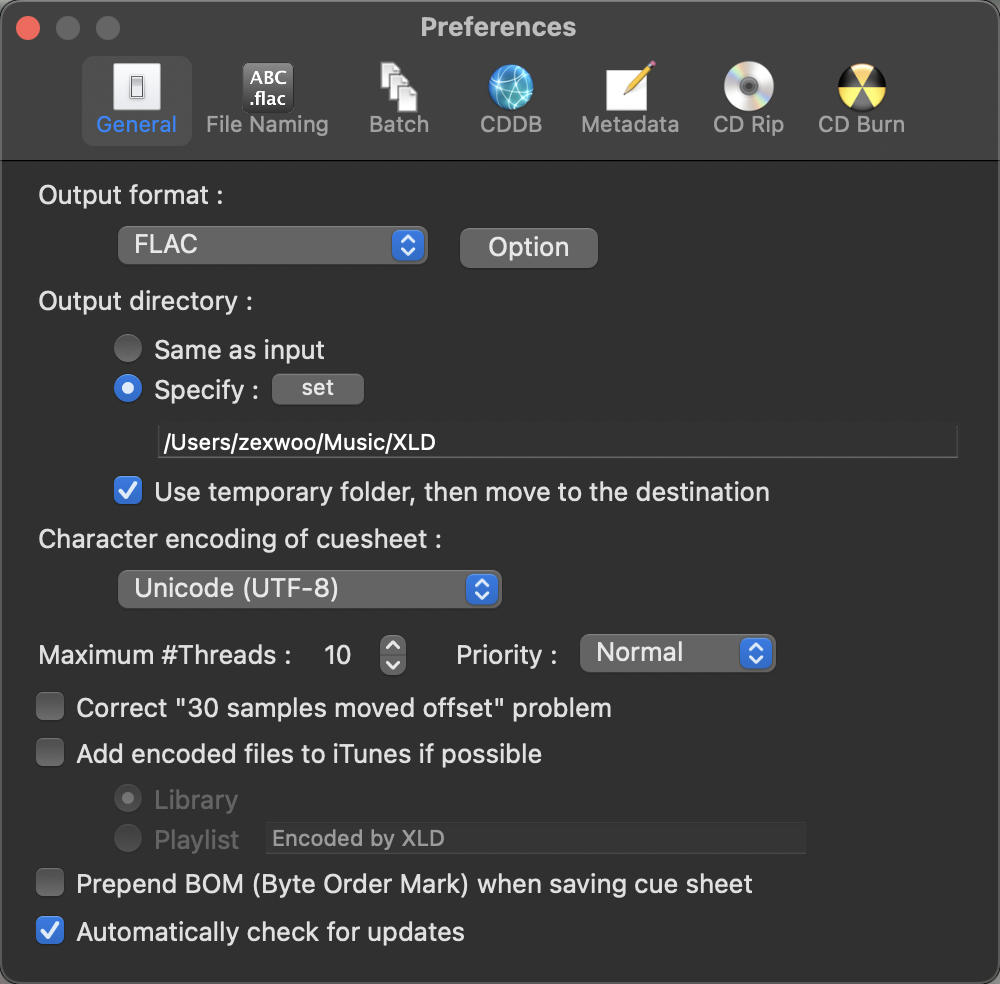
- The Output directory is set manually each time you rip a disc. If you wish to have a default directory for transcoding, then you may set it now. If you extract the files on your internal drive, pay attention to not set your default directory in your user account, given that the log will refer to it. Instead, you can create a directory for rips in the root of your mac (/rips) or another directory in /Users/ which doesn’t conflict with another account.
- Set Character encoding of cuesheet to Unicode (UTF-8).
- Check the Automatically check for updates box. XLD will check for new versions whenever it is launched. The XLD developer frequently releases updates, so checking this box is highly recommended.
- The Maximum #Threads setting is the number of simultaneous audio conversions that XLD will perform. If you have a multiprocessor or multicore Mac, you should change this setting from 2 to however many your system has. It should be set automatically.
- DO NOT check the Correct “30 samples moved offset” problem box. In brief, if you have the box checked, then your CRCs will not match those of EAC or another ripper. There is no reason to check this box if you are ripping a CD. (For a more technical explanation, see this thread. This option can partially fix a problem with EAC’s offset detection, but it is irrelevant for our purposes.)
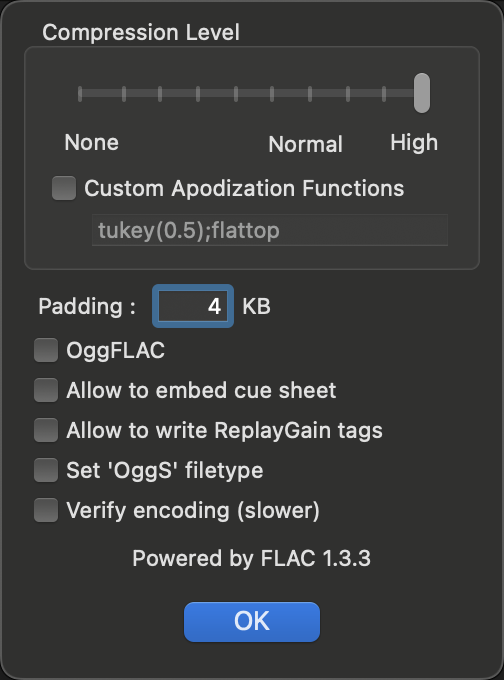
- Click on the Output format drop-down menu, select FLAC, and click the Option button. Drag the Compression Level slider to High, and uncheck “Allow to embed cue sheet”. Then click OK.
File Naming
- There are several options for filenames and directory names. It is ALWAYS recommended to include, at minimum, track number and track title in the filenames. A meaningful directory name is also required: the minimum is to include the album title, and the recommendation is to use “Artist – Album (Year) [Format]”. These information should be contained.
- When ripping or converting, consider using one of the following:
%A - %T (%y) [%f]/%n. %t. (Click the Custom radio button to enter text.) Either of these codes will create a folder for you and put the tracks in it. Copying the code from this page then pasting it into the field is recommended to prevent code input errors.- Note that
%fisn’t always all that useful, as discussed below: - ‘LAME MP3’ is not as descriptive as ‘V0’ as you’ll have to manually correct that if you rely on the %f option. However, XLD will create one folder for each format you are ripping to multiple formats! A workaround to this previous limitation is to set the Output format (under the General tab) to Multiple Formats, then each of the output formats (%f) can be named to appropriate names such as V0, V2, 320K LAME, etc.
- Note that
- For compilations, you could use
%A - %T (%y) [%f]/%n. %a - %t, which adds the track artist to each track name. - You can choose from the following options, detailed in the list below:
- Note that forward slashes (i.e., /) will be translated to new folders.
- %D - disc number
- %I - disc id
- %A - album artist
- %T - album title
- %a - track artist
- %c - composer
- %f - format (the same name as in the ‘Output format’ dropdown, so ‘FLAC’ or ‘LAME MP3’, etc.)
- %g - genre
- %i - ISRC
- %m - MCN
- %n - track number%t - track title
- %y - year
- When ripping or converting, consider using one of the following:
- Set the filename option to Overwrite.
- In this tab, you may also specify character replacements, which are useful since certain operating systems have a restricted character set that cannot be used in file names. While OS X may handle these characters perfectly well, other operating systems, such as Windows, will not allow for these characters in the file names.
? < > \ * | " /. Simply copy & paste any of the below replacements in if you want them.- Replace
"with'' - Replace
\with\ - Replace
/with/ - Replace
:with: - Replace
*with* - Replace
?with? - Replace
<with< - Replace
>with> - Replace
|with|
- Replace
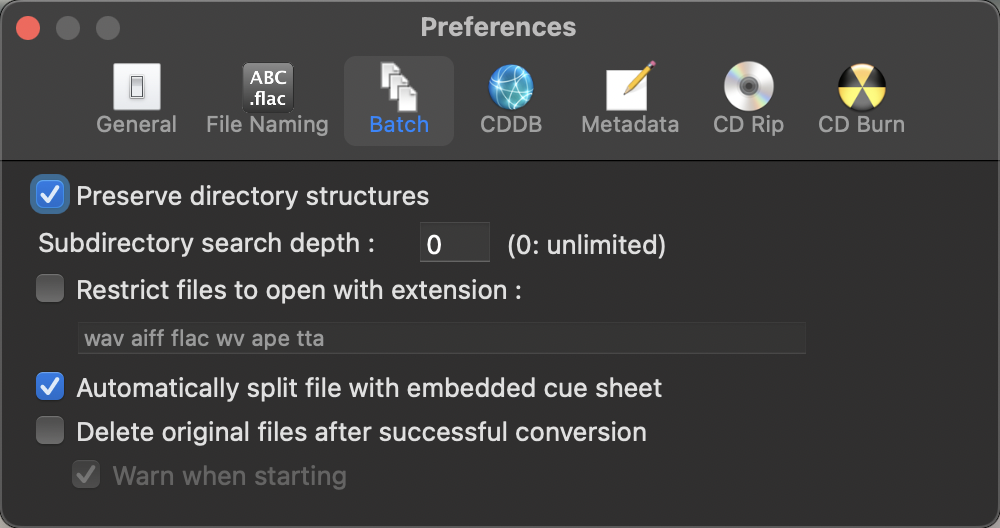
Batch
It is useful when converting nested directories, such as one folder that contains two more folders with tracks you wish to convert. You can drag the main folder onto XLD’s dock icon and it will batch-convert the folders.

- Check the Preserve directory structures box.
- Set Subdirectory search depth to 0.
- Optionally, check the Automatically split file with embedded cue sheet box. Single-track rips are beyond the scope of this article, as unsplit lossless albums are not considered perfect.
CDDB
The CDDB tab can be left alone. You may edit the settings if you feel so inclined.
Metadata
In the Metadata tab, you choose whether or not you want to embed album artwork into files. Combined padding and embedded images should be kept below 1024 KB per file. To avoid the problem entirely you may simply choose to not embed album artwork.
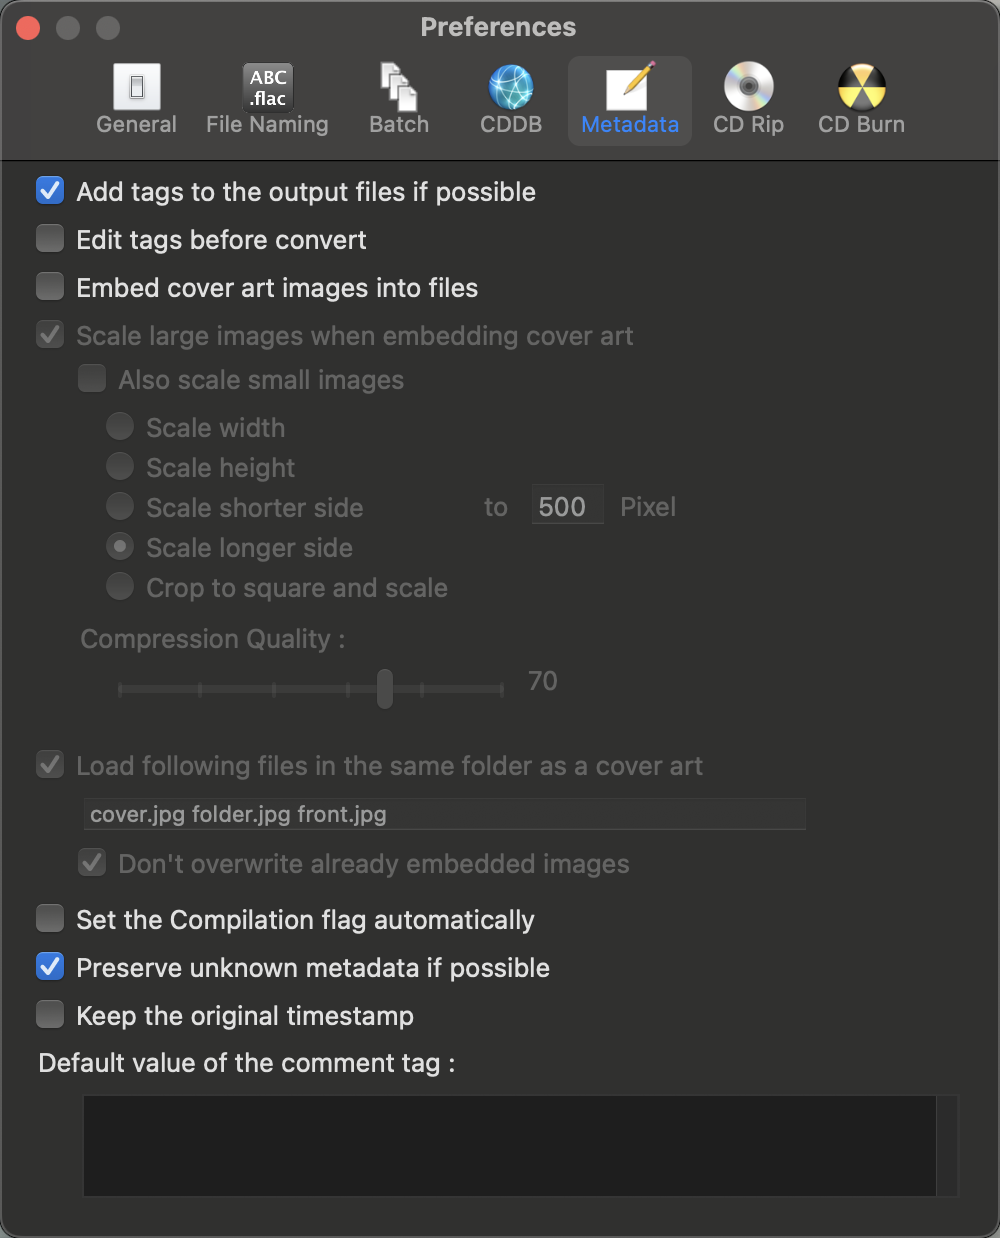
- Uncheck the Embed cover art images into files box, if you choose.
- Uncheck the Set the Compilation flag automatically box.
- Edit tags before convert will force XLD to prompt you to review and edit tags before making any conversions, including ripping CDs. Check the box if you choose.
- It is generally okay to leave the Preserve unknown metadata if possible box checked, but you may disable it if you choose.选。
CD Rip
These settings are crucial to obtaining an exact copy of a disc (100% Log).
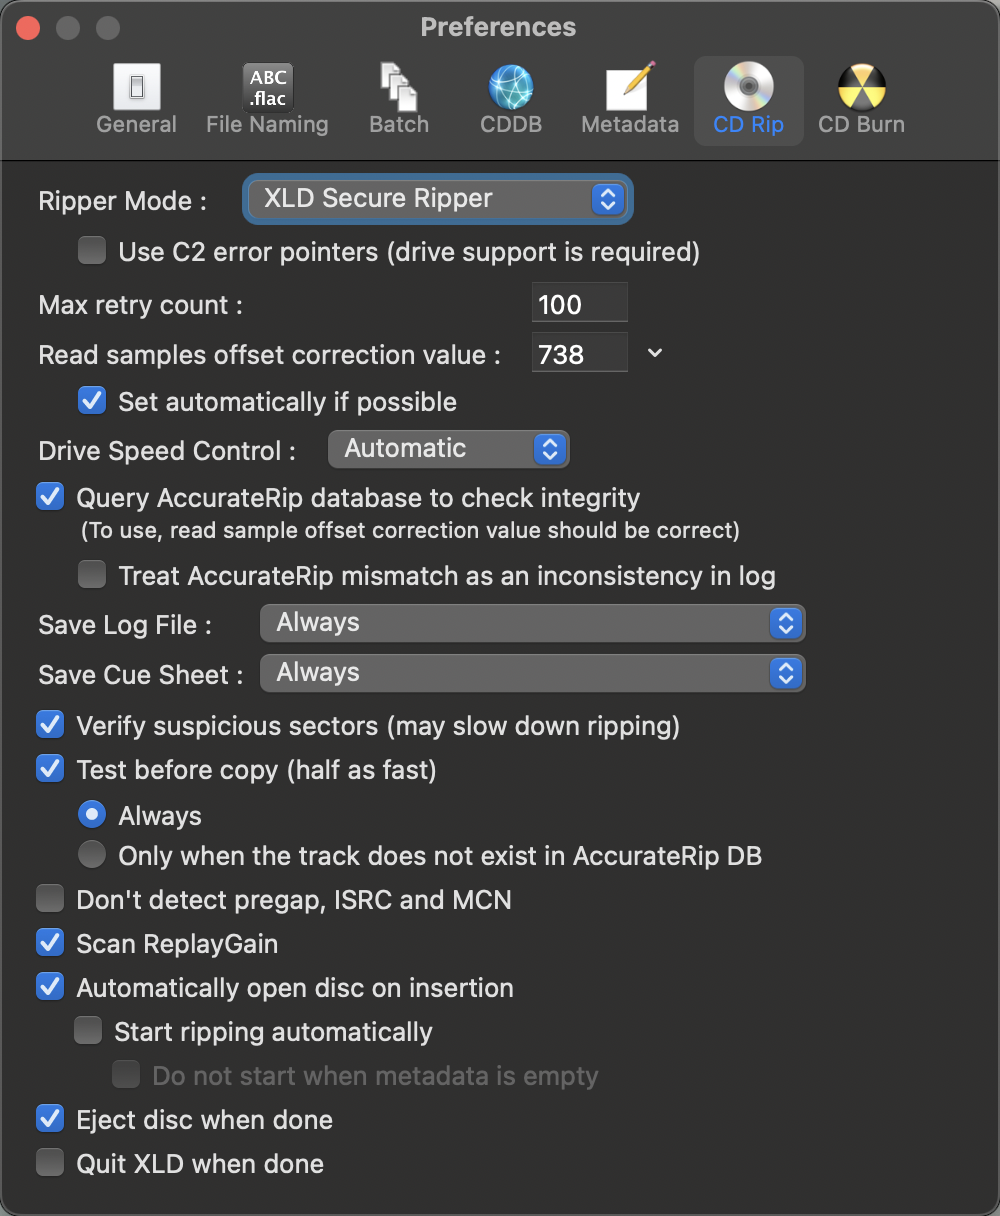
- Use the XLD Secure Ripper Mode.
- XLD should be able to read your drive’s Read sample offset correction value automatically. Click the black triangle next to the field to display your drive(s). You can look up your drive in the AccurateRip drive offset database. NOTE: Matsushita brand drives are listed as Panasonic in the AccurateRip list. Normally, however, XLD can find your drive’s offset, so this step is usually unnecessary.
- 如 f your drive’s read offset is correct, then XLD will try to search the AccurateRip database to verify the integrity of your rip by comparing it to the rips of other people. See http://www.accuraterip.com for more information. DO NOT check the “Treat AccurateRip mismatch as an inconsistency in log” box.
- Always save a log file and cue. Without a log, there is no easy way to verify the quality of your rip.
- Verify suspicious sectors - the logchecker will deduct points if this box is unchecked. Without this setting, your log score will be decreased by 5 points.
- Always enable Test before copy (also called test-and-copy).
- Check the Scan ReplayGain box. Regardless of whether you prefer ReplayGain tags in your music files, ReplayGain should be enabled here. XLD will not add ReplayGain tags to the FLAC files, but it will include peak level information in the ripping log. This is used to help differentiate the different pressings of discs.
Ripping
Now that we have configured XLD, we can finally begin ripping CDs. Once you have XLD configured once, you can jump straight here each time you want to rip a disc.
- To automatically fill in the CD information, you may open iTunes first.
- Wait a minute, iTunes can fetch the CD information from the internet unless your CD is exceptional.
- Now, open XLD, which can import the information from iTunes.
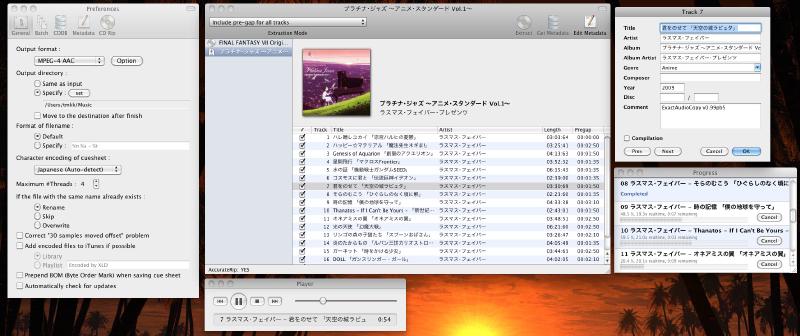
- XLD will automatically detect pre-gaps for the disc:

- Add tags (If you have filled it with iTunes’ help, just check if the information is correct here).
- Go to CDDB menu > Query Items > and choose the options you would like. It is recommended to not embed artwork, as it may be of low quality or incorrect. It is simplest to include the album cover as an image in your torrent directory, e.g. a
cover.jpgor afolder.jpg.
- Then, go to CDDB menu > Get CD Track Names to check MusicBrainz and/or FreeDB for tags.

- If tags are not found or are incorrect, then manually enter the correct tags. In the image below, tags cannot be found. Select all the tracks (Command-A), and then go to File menu > Edit Metadata, or hit Command-I.

- You can now enter the artist, album title, year, and disc number automatically for all tracks.

- Click OK when done.
- Then, click the first track to select it, and then hit Command-I again (or go to File menu > Edit Metadata).

- Enter the correct track title for the first track, then click Next, then enter the correct track title for the second track, then click Next, then…. Repeat until all track titles are entered, and click OK.

- At the top of this screen before you rip you should select the option Include pre-gap except for HTOA. If a CD you rip has hidden track one audio or a track hidden in the pre-gap (or even simply some empty space as is quite common, and illustrated in this example), this option will cause XLD to rip like EAC and not include the pre-gap audio in the first track.

- Note: If you need to extract the hidden track one audio (HTOA), rip the track again using the option “Include pre-gap for all tracks.” This will make XLD rip starting at sector 0 where a hidden track would be instead of where the regular first track begins. Ripping as a single file is another way to extract pre-gap audio, but should be avoided if you are doing just a normal CD rip, as a single file rip will not be scored 100%. It is suggested you do this after copying your first rip elsewhere as not to over-write anything you’ve already done. You may then split the ‘Track 0’ out from this track 0+1 file using other means and may include it in your upload.
- Go to CDDB menu > Query Items > and choose the options you would like. It is recommended to not embed artwork, as it may be of low quality or incorrect. It is simplest to include the album cover as an image in your torrent directory, e.g. a
- Click
Extractbutton , and XLD will begin extraction.A new window named Progress will appear. XLD will rip the first track once (as a test), and then rip it again (as the copy saved to your disk). The CRCs for both tracks will be written to the log file and checked against the AccurateRip database, if your disc is found. Extraction may take anywhere from 30 minutes to over an hour, depending on your drive, the length of the disc, and the condition of the disc.
 - When the extraction has finished, a new window named Log appears. Because you have told XLD to always save a log file, you can close this window. The log file will appear in the same folder as the FLAC files and cue sheet.
 The log file and FLACs will be put in the same folder with the cue file.
 - Note: XLD does not append logs, if you plan on ripping a multi-disc release make sure you either rename the log file after each CD or move them to a different directory. XLD will overwrite your log entirely if you don’t move it or rename it, which defeats the point of this guide — given it will ruin your ability to score your logs.
Reading Your XLD Rip Log
Main things to look for:
The main things you need to look at are log errors, the test CRC hash, the actual rip CRC hash, and AccurateRip results to justify the CRC values from the test and rip. These are explained in more detail on the following sections.
IMPORTANT: Editing, modifying Log files is strictly forbidden.
AccurateRip
Under the “CD Rip” tab in the Preferences, you’ll find a box that asks whether you want to query the AccurateRip database to confirm authenticity. There is no reason to uncheck it. AccurateRip may or may not confirm whether an album has been ripped properly: there are false negatives from previous poor submissions, false positives (rarely) from identical bad rips, and many, many albums with no data at all. This is why it is best to leave the Treat AR mismatch as an inconsistency… check box in the CD Rip tab in your XLD preferences unchecked.
That said, some users (both downloaders and uploaders) appreciate the confirmation from a matched album in the AccurateRip database.
If you have enabled an AccurateRip check and the CD you are trying to rip is in its database, [AR] will appear in the XLD application’s title bar.

Errors
Sometimes you may get errors in ripping your tracks. Some are still acceptable if you only see 1 or 2 of them, others are not so good and can greatly affect quality of your rips. Because XLD uses Secure Ripper, logs may sometimes list a number of errors and still report the No errors occurred / End of status report message. This is similar to a proper EAC rip that reports one or more track values of under 100%.
Bad errors
If you have any of these, you should re-rip those tracks with the errors:
- Read Error
- Damaged Sector Count
Acceptable Errors
These errors are common and most often can be fixed. They will not affect the quality of your rips. These are labeled as maybe fixed in the log.
- Jitter error (maybe fixed)
- Retry sector count
Conclusion
If your CRCs match up and you don’t have any of the “bad” errors that are listed above, then your rip is considered good. AccurateRip isn’t that relevant to your rip as things can interfere with the quality of AR results as I stated above. A rip that only has Edge, Atom, Drop, Drift, or Dupe “maybe fixed” errors is most likely clean. For a detailed discussion of XLD’s error reporting, see this thread at HydrogenAudio.
Credits
This tutorial owes thanks largely to Symmetry1618. The material has been copied to a large degree from this excellent tutorial. Additional input/screenshots from brstp’s guide was also invaluable. Special thanks to m0ndrian for update information/screenshot on C2 Pointers. -clockoutx
Use Log Checker to Detect If a Log File Is Reliable
Please read EAC/XLD Log 可信度检测指南.